This is similar plugin to WiiMote Cam.
Installation
- Uninstall EyeToy drivers.
- Download & install (with "developer" libs):
CL-Eye-Platform-SDK. - Install EyeToy drivers (same as removed in step 1):
CL-Eye-Driver.
Setup - dots detection
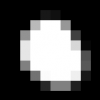
This is "a dot" or "how PS3Eye see IR-LED":
Now look at one line of pixels:
In the menu, you can set:
- Min. brightnes - all points in picture from cam with brightnes below this level will be will be considered black (brightnes = 0). This value is used mostly to eliminate "noise" and separate dots from background. If you set Min. brightnes value to 0 and set gain & exposure like "Simple PS3Eye", you will see in "cam view" normal, picture from cams (well... almost).
- Req. brightnes - every dot has one pixel with maximum brightnes, this value is used to eliminate "dots" to dark. I usly don't use this value.
- Min. dot weight - for every "dot" is calculated "weight". It is the sum of brightnes of all pixels in dot. This value is used to eliminate "noise" from cams.
How to set it up:
- gain - this is the typical param of camera. If you increase this value, it will increase brightnes of all pixels... but at the same time it will increase amount of "noise". It is like the digital zoom in a photo camera. It will allow you see better but will not increase quality of information for BAM. You should set this to zero for dot detection.
- exposure - this is the time it takes for the camera sensor to gather light. This is the best way to increase brightness of "dots" because if you increase it, you will not increase "noise". I set it to: 200-300.
- Min. brightnes - level of "noise" in camera picture, when i set gain=0 is ~30. You should initially set this value to ~20 (small amount of "noise" is not a problem for BAM). If you see "room" in cam view, you can increase this value. It will be no problem to set Min. brightnes=100. When you increase Min. brightnes, you will probably have to increase exposure.
- Req. brightnes - now it is not very useful. I usually set it low (=100). If You have object visible in cam view but this object "maximum brightnes" is lower than brightest of IR-LED You can increase this value to eliminate detection of this "spot" as IR-LED. Be carefull with this. If you move IR-LED to this bright spot, then around the IR-LED will not be a black border, BAM can detect pixels of LED and this spot as one big "dot".
- Min. dot weight - i set this to 200-300. It can eliminate realy small false "dots" from background.
To get best "subpixel" accuracy BAM should get "dots" with high brightness. In the menu, there are few more options:
- FPS - how many frames per second will be taken from cams. I set this to 60, but you can test some other setting.
- Resolution - with 640x480 dot detection is more accurate, but FPS is limited to 75. Only in very rare situations you will see difference betwen 640x480 and 320x240. You can change this in any time. When you change it no calibration is required. Higher resolution requires more CPU power. Notice: When BAM draws picture from cams in menu, a lot of CPU time is used to manipulate pictures. This "CPU power" is used only when BAM menu is visible. "normal" game pixel detection doesn't consume a lot of CPU time.
In menu there is option OSD. You can select what additional information will be displayed at "cam view". If you select "histogram" on top of cam view, a red line will be drawn. It represents number of pixels with specific brightes on picture. On right are pixels with lower values (starts from 1). It can help to set right "dots detection".
Calibration
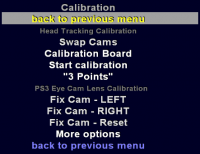
This is submenu is to calibrate cams for head tracking. Most of the options are similar to "WiiMote cams":
- Swap Cams
- Calibration Board
- Start calibration
- "3 Points"
I will not describe here how to use this (same procedure as "WiiMote cams"), but here are a few tips:
- During calibration don't try to "cover" whole visible space for cams.
- Start at "center" for both cams.
- Try to not rotate board.
- Keep calibration board in radius ~20 cm from start position.
- First 5-10 frames are most important. Try at begin have one fram at center, and 4 frames at square corners at same distance from cams.
Problem with camera lenses: greater FOV gives greater distortions of picture.
To make cams usable for "head tracking" BAM has to correct pictures taken from PS3Eye camera and make the straight lines, straight again. To accomplish this, use the following menu commands:
- Fix Cam - LEFT
- Fix Cam - RIGHT
When You select this command, BAM will take 40 frames (with 4 dots of calibration board), and use this data to correct distortions. Process is very similar to "calibration of 2 cams", but You should "cover" whole visible space (in same distance from camera). You do it for one cam at time. Then BAM collects 40 frames and will calculate "fix" for cams. Calculation will take 1-2 minutes (2x-4x longer than calibration for 2 cams).
You can set OSD to grid. BAM will display grid on image. It will give You better view how corrected picture from cam looks for BAM. It will probably look like this:
Sometimes calibration goes wrong, and You will see really weird things in cam view.
You should repeat "Fix cam lense" calibration (and make sure, that you set correct values in calibration board).
Fix Cam
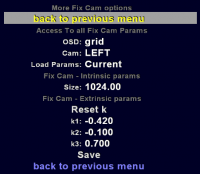
If you select more options in calibration menu, then you have access to Fix Cam params. In this menu:
- osd - select additional info displayed over Cam View
- cam - selet on which cam you work (Left / Right)
- Load params - every time you change this option, plugin will load "fix cam" param to menu:
- current - setting of Fix Cam you use now
- Last modified - If you manually modify values and change again "Load" for example to "current", before loading of params, change values are stored in "Last modified"
- Second Cam - If you want copy values from one cam to another, you can use this option
- Last Saved - Every time you "save" setting (last option in this menu) values are: 1. set as fix cam for selected Cam. 2. Save to disk.
- ravarcade 3.6mm - my settings. Plugin have built-in default params used to fix distortions. - k1, k2, k3 - are values from "polynomial" and describe lens curve.
- size - this value limits range of used "polynomial"
- Save - set values for lens and save it to file: HT-PS3Eyes-FixCamExport.dat
If you try to manipulete these values, you will see "real time" effects on cam view. When you change values remember to "save" it. If you leave menu without saving, there will be no changes in "fix cam". After you save "fix cam" params, you have to do normal "stereo calibration". (If you don't, these new values will not be used. You will only see how they look in cam view).
If you use modified manualy "fix cam" params plugin will set "Fix Cam Quality" to 1.0. Don't worry about this value. It is only valid if You use own "Fix Cam".
You can share "HT-PS3Eyes-FixCamExport.data" file. From this file "FixCam" params can be loaded by others. (or entered manually).
Why I have created these options?
- It is really hard to do good "Fix Cam".
- Fix Cam created for one cam, usually works very well with the other. For example my values created with replaced lenses work quite well with original PS3Eye lenses. It is strange, it should not work, but it does.
- This is fortunate , and if you do only normal stereo calibration (without making own "Fix Cam") head tracking will work very well.
- Try to do test like me on video: https://www.youtube.com/watch?v=C4tknTMgLXo
NOTICE:
- Data calculated during "Fix cam" is valid as long as you don't change lenses (or change focus).
- If you move cams, only normal calibration for 2 cams is required.
- Under cam view BAM displays Camera Fix Quality. It should be lower than 0.5. I sometimes get it lower than 0.1. Very small values don't guarantee better results, but big values mean: calibration fails.
- After "Fix cam," you can increase gain and exposure and set Min. brightnes to 0. This way you will see in cam view normal image of your room. You can check if the string lines are realy straight. (Use some long object with straight edges).
- You will get better results of "Fix cam" and "Calibration (for 2 cams)" if dot detection has better accuracy. You can set resolution to "640x480" only for calibration.
 visual_manual.pdf, Fix Cam - How to


